|
Welcome to week 3 of NAPO’s Get Organized Month! How did weeks 1 & 2 go? Are your holiday decorations safely packed away where you can find everything beautifully labeled & organized later this year? Is your closet everything you hoped & dreamed it would be? Are your mornings more efficient with everything in its proper place? I would love to hear how you tackled each challenge. What was helpful or perhaps other systems you found worked great for your unique space? Organized & Orderly is always here for you, even if you made it half way through a project. It’s what we do so we understand how difficult it can be, not to mention time consuming. But, we love what we do. Now brace yourself, there are 2 more areas left to help you shine in 2020:
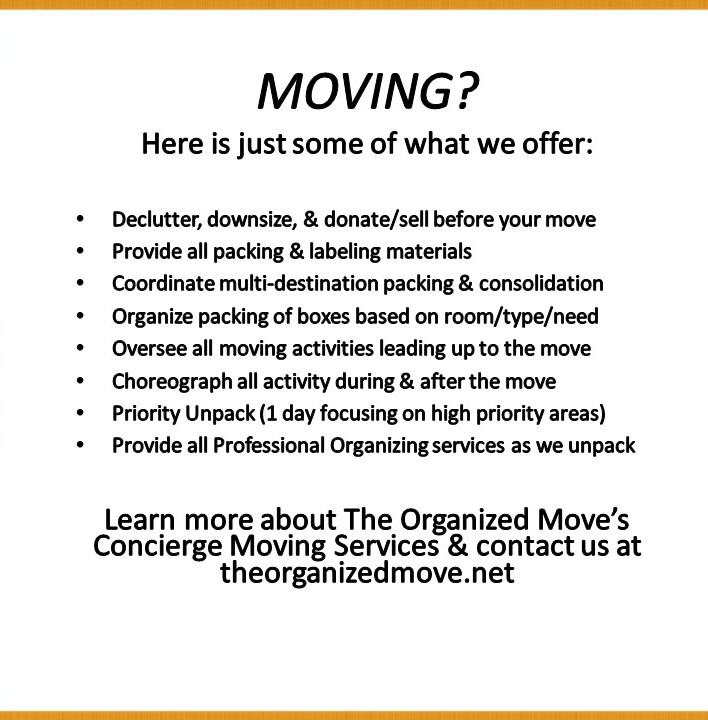
It’s time for that post-holiday kitchen & pantry purge!
…and the biggest trouble maker of all …your garage! Read on for the Insider Tips & Tricks you’ll need to conquer these trouble spots and become Organized & Orderly!
|
|
|
|
Reclaim your Kitchen & make it shine!
The kitchen is an area of your home that gets used more often than most other areas. So it stands to reason that if your kitchen were more organized and simple to use, your life would feel easier. Bring the chaos in your kitchen to order with these smart and affordable ways to organize your kitchen, cabinets, drawers, and pantry. Find a place for everything and enjoy your kitchen again. Check out this video of me completing a total kitchen & pantry revamp in a matter of hours! You can do it too! Below are 10 steps to help you complete ‘Project Pantry’!
Step #1: Empty Cabinets (aka Declutter!!)
Pull everything out of each cabinet and go through it. Discard or donate those things that are not frequently used, duplicate items, broken items or things you forgot you had. Do this with each cabinet and drawer, setting up separate areas on the counters (or even the floor) for each group. Be ruthless. Most kitchens are short on storage space, so the goal is to only have things you love and use.
Step #2: Group Like Items
After your cabinets are all empty, consider what is best for you in terms of how to group items. Sort all your baking items and pile them together. Group the dishes you eat from, glassware, holiday or other seasonal items that only get used once or twice a year, as well as those special entertaining or serving pieces.
Step #3: Organize the Cabinets
Now that you have groups laid out, decide where each item should be stored. Cooking and baking pieces should be kept close to where you do food preparation. Utensils should be in the drawer nearest to the prep area as well. Glassware might be best near the sink or refrigerator. Make a coffee or tea station that includes sugar, mugs and filters, and place it near the water source, if possible. This way you avoid going back and forth across the kitchen for the things you need possibly making a mess.
Step #4: Use Clear Containers to Store Items
Use containers to streamline the inside your cabinets. Group together things like packets of sauce mixes, gravy mixes, hot cereal packets and hot cocoa envelopes, then put them into small plastic containers to avoid them being scattered all over the cabinet. Use clear plastic containers to store items so you can see each item and be sure to label, label, LABEL!
Step #5: Store Containers and Lids Together
Discard containers without lids, and store the remaining plastic containers either with the lids on them, or store the lids in another larger container so they all stay together. Do the same with the lids for your pots and pans. A large clear plastic box will keep them nicely together and on their sides. Another option is to store them on their sides in the cabinet on a wire rack.
Step #6: Make use of Vertical Space
Place hooks underneath cabinets to hold mugs above the countertop, or hang a stemware rack in the same spot for wine glasses. This will free up considerable cabinet space. You could also hang adhesive hooks on the inside of cabinet doors or pantry doors to hold tools such as measuring cups, oven mitts or other kitchen gadgets. Consider using wall space or a ceiling rack to hang pots and pans. Keep in mind that any space you can use to hang something will free up flat space inside a cabinet.
Step #7: Use Lazy Susans
Rotating trays can be used to hold things such as oils, vinagars and other cooking ingredients, as well as spices, vitamins or medications. You can also use a few lazy Susans in your refrigerator – one for beverages, so nothing ever hides in the back to spoil or freeze, and another for leftovers or small jars of pickles, olives or other small food items.
Step #8: Use Drawer Dividers
Drawer dividers are great for cooking utensil drawers and your junk drawers. Everyone needs a place to keep those little miscellaneous things, but they don’t have to be overflowing and junky. Drawer dividers will allow you to assign a little spot for each thing, and you’ll be able to find things when you need them.
Step #9: Sort Papers
Get a magnetic sorter box to hang on the side of the refrigerator for coupons, takeout menus, a notepad and pen or other papers that tend to accumulate on the countertops. Each type of paper should have its own section in the sorter.
Step #10: Clean Out the Refrigerator
Keep trash bags near the trash can, and throw a stack of loose bags into the bottom of the can. That way, when you pull out one bag, there is already another one right below it waiting to be used. If you put your trash out at the curb one night a week, use that time to clean out your refrigerator each week too. See what food needs to be pitched and immediately throw it out, and take the trash out to the curb right then. Your refrigerator will house only current items and will be less cluttered – and it only takes a few minutes. Here’s a quick video for a little added help.
Please give me a call at my NEW number, 949.667.4664, or email me and let’s see how I can help get you more Organized & Orderly in 2020!
|


|
|
|
Your final week of Get Organized Month!
Are you as excited as we are to tackle the most infamously cluttered space in your home? That’s right, it’s time to take ownership back over your garage! Have you looked in your garage lately, and I mean really looked at it, as opposed to just quickly parking your car in there and hurrying into your house. Or, really, can you actually park your car in your garage? If not, wouldn’t you like to?
Life happens, and for some reason it seems that the garage is the place a lot of clutter and junk gets stashed when we need to put that thing, “somewhere” for a while. So it can hold all kinds of things from boxes, bikes and other similar toys, tools, yard equipment, sports equipment, auto care products, and more.
Garages tend to become dumps for just about everything. Because they are big open spaces, they’re easy targets for that suitcase that won’t fit in the closet, the rollarblades your daughter doesn’t want to throw away yet, the sewing machine you need to give back to your neighbor, and anything else that doesn’t have a set place.
Let’s close out Get Organized Month with a BANG! Read on for 5 ways to streamline the process …at Organized & Orderly we’ve done this a time or two 😉 If the below image looks familiar, you may want to give us a call ~949.667.4664
Step #1: Empty EVERYTHING out
Pull everything out of the garage and into the driveway. Try to group like-items as you pull them out. Looking at the space you have as a blank canvas can give you a better idea of what you’re working with which will greatly assist you when it comes to reorganizing. Be ruthless -the key here is to create MORE storage space, so keep only what you cannot live without.
Step 2: Declutter!!
What’s the point of packing something away in the garage if you’re not keeping it? Isn’t that how we even got into this mess? Get rid of all the junk and clutter in your garage that has accumulated over time. Just like with the other storage areas we often place items in a sort of limbo in this area, deliberately putting off making decisions about them, not wanting to have to decide if we should continue to keep them in our home. Decide what to keep, what to donate, and what to throw away. When you find yourself questioning a particular item, ask yourself:
Clearing out clutter is incredibly satisfying, and odds are you won’t really miss that fifth spare tennis racket. When in doubt, donate or toss it. Recycle as much as possible, and be sure to dispose of paint and other hazardous waste safely.
Step 3: Create designated zones
While decluttering your garage you should have an end goal in mind of what you’d like to do with this area of your home. Since there can be a lot of space within your garage I find it handy to think of possible uses for it in zones. Here is a 3-way split to consider:
Step 4: Consider all of your storage options ~space & containers!
Organize the items you’ve decided should stay in your garage according to the zones you’ve designated; this will assist in choosing not only where in the garage to place the items but, also what container sizes will be best. Just remember that clear sterilite containers will be the easiest long term as you can see the contents, and always label everything! But before the containers, come the shelves, uniform shelving units & cabinets to house your containers lined evenly along the wall will consolidate everything. And most importantly, particularly in the garage, go vertical with your storage, it makes even more room for the car!
Step 5: Put everything in its place & LABEL ALL OF IT!
Finally, you can prevent a lot of frustration by properly labeling storage bins or anything that you have to open to access items. If you have small items like different sized screws and nails, you should put these into small containers and mark them accordingly. It may be a little more tedious at first, but it will, without a doubt, make your life easier later on. That’s why we’re doing this right? 🙂
Check out my Gallery showcasing a few of my Garage revamps over the years! Remember to Keep Calm & Get Organized, I’m just a phone call away 949.667.4664.
|


|
|
Be Inspired!
The National Association of Productivity & Organizing is a United States association dedicated to the field of organizing. In 1983, a group of women in Los Angeles gathered together when realizing they shared a common interest – organizing people’s homes, businesses and time. All of these women shared an entrepreneurial passion for helping others get organized. They started the Association for Professional Organizers and continued to meet regularly in their homes. In January 1986, the group had grown to 16 women who formally created a non-profit association that would meet regularly, collect dues, adopt bylaws and be run by a board of directors.
This was officially the beginning of the National Association of Professional Organizers as we know it today. Today, NAPO has over 4000 members, including myself of course, and people all over the world! NAPO’s current tagline, The Organizing Authority, demonstrates their professionalism, expertise and service to those in the organizing field. January is now officially know as National Get Organized Month because of this amazing organization.
So stay the course, you can do this, and remember I’m always just a click away, or you can call me direct at 949.667.4664. Here are 12 Reasons you need a Professional Organizer in your life <3
|